Radarcape:SD Card Howto: Difference between revisions
imported>Beastadmin No edit summary |
update BBW image |
||
| (40 intermediate revisions by 3 users not shown) | |||
| Line 1: | Line 1: | ||
= | {{#seo: | ||
|title=Create Radarcape SD Card | |||
|titlemode=replace | |||
|keywords=radarcape,sd,card,howto,create,beaglebone,white | |||
|description=How to create a new SD card for your Radarcape (Beaglebone white, only) | |||
}} | |||
{| | |||
|[[File:Expert.png|For Experts]] | |||
|''Required Unix/Linux skills to execute this task: Advanced'' | |||
|} | |||
__TOC__ | |||
This page describes how you can install a Linux system on the SD card. This is a bring up from zero and is necessary if you want to start from the beginning or if major changes have been applied to the Linux itself. A new SD card can be created either directly on the Radarcape or using an external Linux PC. | |||
== | ==Restoring an SD card for Radarcape with Beaglebone White using Windows== | ||
'''Prerequisites:''' You need a 4GB SDHC capable SD card reader connected or built in at your local computer. | |||
There are two images, please select the one according to your SD card. If you do not have either a Sandisk or Kingston SD card, simply try. This is a fully working version of the given release, including the Radarcape installation. Hostname is radarcape. | |||
[http://www.jetvision.de/resources/RC-BBW-Debian-4.1.30-ti-r60-181116.1000.02.zip Debian Distribution: Sandisk 4GB image with Release 181116] | |||
< | # Get the Windiskimager from http://sourceforge.net/projects/win32diskimager/ | ||
# Unzip the downloaded Windiskimager file, Windiskimager does not need installation, the extracted files work directly | |||
# Download the image from above link | |||
# Unzip the downloaded Radarcape SD image | |||
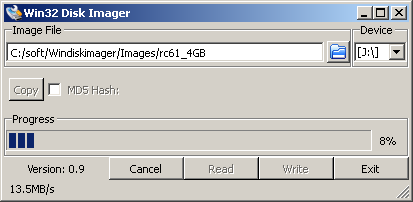
# Using Windiskimager, write the image to the SD card. '''Carefully select the device that it is written to. Better unplug all other USB storages.''' | |||
# After your Radarcape is back in operation, you may want to update to the latest release | |||
<p> | |||
[[File:windiskimager.png|none|frame|thumb|Windiskimager in operation]] | |||
===True Miscellaneous=== | |||
Packages required to create an SD card on a Radarcape: | |||
* opkg install e2fsprogs-mke2fs rsync | |||
* opkg install dosfstools | |||
Latest revision as of 15:33, 24 February 2019

|
Required Unix/Linux skills to execute this task: Advanced |
This page describes how you can install a Linux system on the SD card. This is a bring up from zero and is necessary if you want to start from the beginning or if major changes have been applied to the Linux itself. A new SD card can be created either directly on the Radarcape or using an external Linux PC.
Restoring an SD card for Radarcape with Beaglebone White using Windows
Prerequisites: You need a 4GB SDHC capable SD card reader connected or built in at your local computer.
There are two images, please select the one according to your SD card. If you do not have either a Sandisk or Kingston SD card, simply try. This is a fully working version of the given release, including the Radarcape installation. Hostname is radarcape.
Debian Distribution: Sandisk 4GB image with Release 181116
- Get the Windiskimager from http://sourceforge.net/projects/win32diskimager/
- Unzip the downloaded Windiskimager file, Windiskimager does not need installation, the extracted files work directly
- Download the image from above link
- Unzip the downloaded Radarcape SD image
- Using Windiskimager, write the image to the SD card. Carefully select the device that it is written to. Better unplug all other USB storages.
- After your Radarcape is back in operation, you may want to update to the latest release

True Miscellaneous
Packages required to create an SD card on a Radarcape:
- opkg install e2fsprogs-mke2fs rsync
- opkg install dosfstools