Air!Scout:Flarm Local Receiver: Difference between revisions
Jump to navigation
Jump to search
No edit summary |
No edit summary |
||
| (4 intermediate revisions by the same user not shown) | |||
| Line 1: | Line 1: | ||
====Local Flarm Receiver (Optional)==== | ====Local Flarm Receiver (Optional)==== | ||
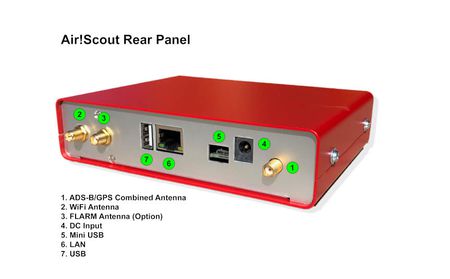
[[File:Airscout Rear V2.jpg|450px|Air!Squitter Rear Panel]] | |||
Air! | Air!Squitter can optionally be equipped with a RTL-SDR stick, and by that serve some SDR applications. It comes with preinstalled software from the Open Glider Network (see http://wiki.glidernet.org/start). Air!Squitter is able to include the results of this receiver into its own database and show FLARM aircraft together with ADS-B and MLAT data in a common map. However, in order to work correctly, some steps have to be done after installation of the hardware: | ||
* Check that GPS is stable (Status -> GPS) | * Check that GPS is stable (Status -> GPS) | ||
| Line 14: | Line 14: | ||
* Watch the incoming messages from OGN receiver (Status -> Local FLARM Receiver Connection) | * Watch the incoming messages from OGN receiver (Status -> Local FLARM Receiver Connection) | ||
<br> | |||
[[File:OGN_Status.png|450px|Incoming FLARM results]] | [[File:OGN_Status.png|450px|Incoming FLARM results]] | ||
In case of troubles, disable and re-enable the OGN receiver part within Settings -> External Sources Settings -> Local Flarm Receiver Data Reception -> Save | In case of troubles, disable and re-enable the OGN receiver part within Settings -> External Sources Settings -> Local Flarm Receiver Data Reception -> Save | ||
Latest revision as of 15:24, 7 August 2019
Local Flarm Receiver (Optional)
Air!Squitter can optionally be equipped with a RTL-SDR stick, and by that serve some SDR applications. It comes with preinstalled software from the Open Glider Network (see http://wiki.glidernet.org/start). Air!Squitter is able to include the results of this receiver into its own database and show FLARM aircraft together with ADS-B and MLAT data in a common map. However, in order to work correctly, some steps have to be done after installation of the hardware:
- Check that GPS is stable (Status -> GPS)
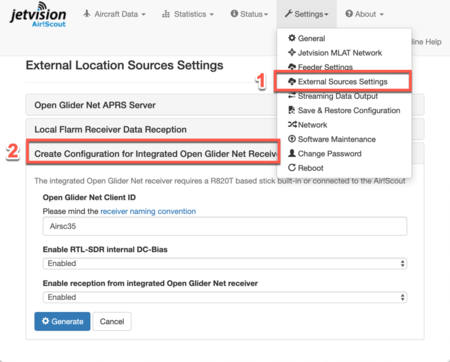
- Create the configuration file for OGN receiver (Settings -> External Sources Settings -> Create Configuration for Integrated Open Glider Net Receiver)
- Select a location name according to the naming rules
- Enable bias current if you are using Jetvision's Active Diapason Antenna
- Enable reception of local results
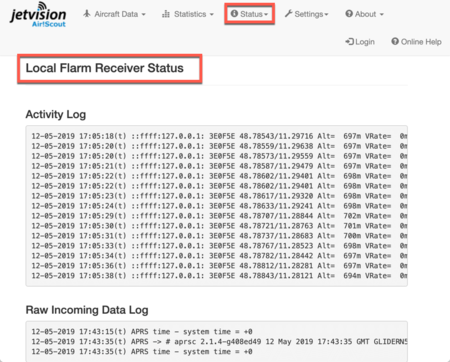
- Watch the incoming messages from OGN receiver (Status -> Local FLARM Receiver Connection)
In case of troubles, disable and re-enable the OGN receiver part within Settings -> External Sources Settings -> Local Flarm Receiver Data Reception -> Save


