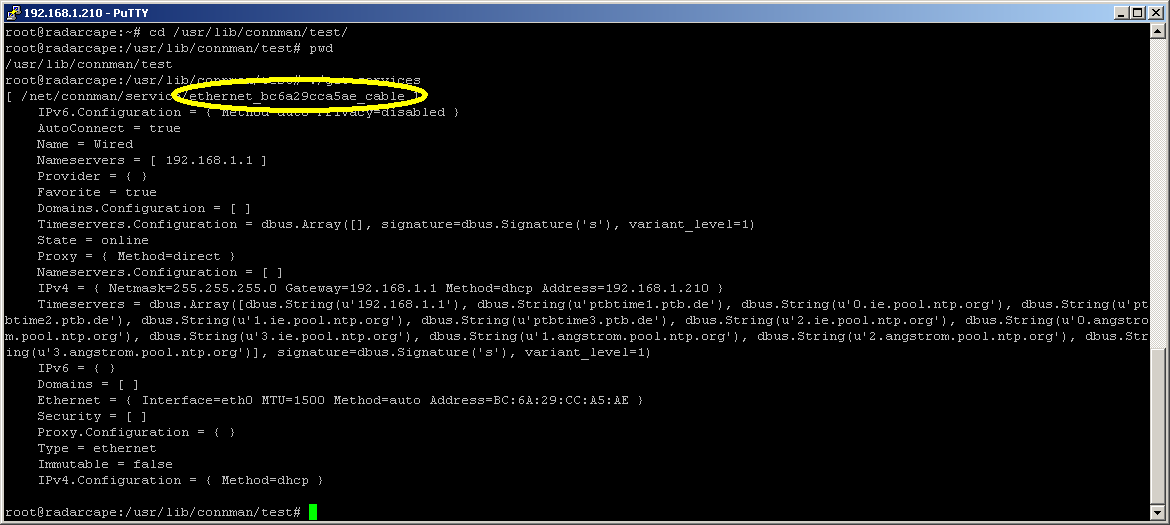
Radarcape:Fixed IP Address: Difference between revisions
imported>Dl4mea No edit summary |
No edit summary |
||
| (22 intermediate revisions by 3 users not shown) | |||
| Line 1: | Line 1: | ||
= | {{#seo: | ||
|title=Radarcape Static IP Address | |||
|titlemode=replace | |||
|keywords=radarcape,fixed,ip,address,configuration | |||
|description=How to configure a fixed IP address on the Radarcape | |||
}} | |||
NOTE! This is unusal and not the regular case. It may be necessary in these cases: | |||
{| | |||
|[[File:Expert.png|For Experts]] | |||
|''Required computer skills to execute this task: Advanced'' | |||
|} | |||
== Debian: Static IP Address / Direct Network Connection without DHCP== | |||
NOTE! This is unusal and not the regular case. It may only be necessary in these cases: | |||
* You do not have a DHCP in your network | * You do not have a DHCP in your network | ||
* You want to use a fixed IP address by whatever means | * You want to use a fixed IP address by whatever means | ||
* You want to connect your Radarcape directly to your PC. For example, your PC connects to the internet router via WLAN and your Radarcape shall connect directly to the PC via Ethernet cable. (Note: In that case it might be possible that you connect the Radarcape to the Router, and then access it via WLAN and via Router, but it might fail) | * You want to connect your Radarcape directly to your PC. For example, your PC connects to the internet router via WLAN and your Radarcape shall connect directly to the PC via Ethernet cable. (Note: In that case it might be possible that you connect the Radarcape to the Router, and then access it via WLAN and via Router, but it might fail) | ||
On those Radarcape based on Debian, the static IP address can be configured in the Configuration - Network Settings menu. | |||
====Accessing the Service Interface==== | ====Accessing the Service Interface==== | ||
| Line 27: | Line 40: | ||
From the [http://www.ftdichip.com/Drivers/VCP.htm link FTDI driver web page], download the driver that fits to your system and install it. You should then see the COM port that becomes created from the Radarcape.<br> | From the [http://www.ftdichip.com/Drivers/VCP.htm link FTDI driver web page], download the driver that fits to your system and install it. You should then see the COM port that becomes created from the Radarcape.<br> | ||
Note: On the | <ins>Note:</ins> On the rigtht side in the table of FTDIs page, the 'Comments' column, there is a downloadable install package, which might be easier to use. | ||
=====Download and execute Putty terminal===== | =====Download and execute Putty terminal===== | ||
We recommend Putty as console terminal, because it also supports SSH network connectivity.<br> | We recommend Putty as console terminal, because it also supports SSH network connectivity.<br> | ||
Download [http://www.chiark.greenend.org.uk/~sgtatham/putty/download.html Putty from here]. There is no need to install, it is directly executable. | Download [http://www.chiark.greenend.org.uk/~sgtatham/putty/download.html Putty from here]. There is no need to install, it is directly executable.<br> | ||
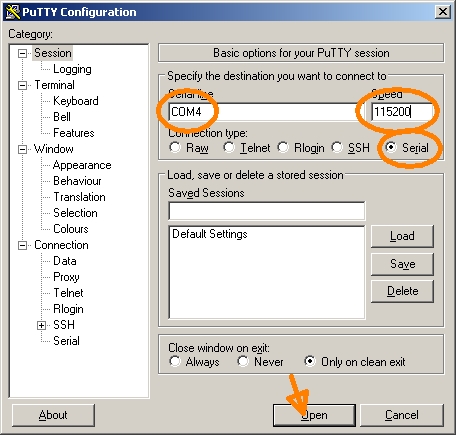
Start Putty and enter the above detected COM port, 115200 and serial into the startup menu:<br> | |||
[[File:Putty_CreateConsole.jpg|456px|Enter values and finally click on 'Open' (see arrow)]] | |||
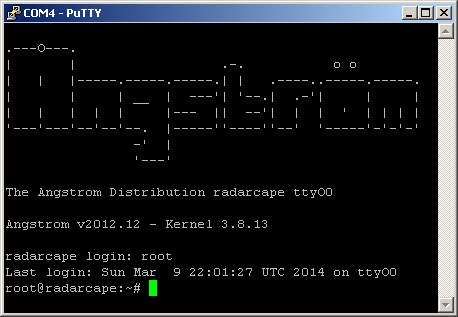
Once Putty is up, press Enter and you shall see something like below. Enter 'root' into the username prompt and simply press enter when beeing asked for your password (or mind your previously set password)<br> | |||
[[File:Putty_Console.jpg|458px|System Console access using Putty]] | |||
=====Display your Current Network Connection===== | |||
Once | Once you have established the console connection, you can see your assigned IP address with the command 'ifconfig'. | ||
[[File: | [[File:ifconfig_output.jpg|570px|The output of ifconfig command shows the IP address assigned to your device]] | ||
=====Modify Configuration for Static IP===== | =====Modify Configuration for Static IP===== | ||
To be continued.... | |||
How to is described here: | |||
http://www.gigamegablog.com/2012/02/06/beaglebone-linux-101-assigning-a-static-ip-address-with-connman/ | |||
IMPORTANT NOTE: These commands must be issued through a serial console connection through the back side USB port, not via an SSH login. When the IP address is changed, it terminates the network connection, and with that it also terminates the setting process. | |||
=====Step 1: Identify the name of your host adapter===== | |||
[[File:Angstrom_static_ip1.png|Identify the name of your network adapter]] | |||
=====Step 2: Swap the IP address===== | |||
[[File:Angstrom_static_ip2.png|Change the IP mode to manual and give IP address, netmask and default gateway]] | |||
=====Step 3: Verify correct setting===== | |||
[[File:Angstrom_static_ip3.png|Verify correct setting]] | |||
Latest revision as of 20:35, 8 November 2024

|
Required computer skills to execute this task: Advanced |
Debian: Static IP Address / Direct Network Connection without DHCP
NOTE! This is unusal and not the regular case. It may only be necessary in these cases:
- You do not have a DHCP in your network
- You want to use a fixed IP address by whatever means
- You want to connect your Radarcape directly to your PC. For example, your PC connects to the internet router via WLAN and your Radarcape shall connect directly to the PC via Ethernet cable. (Note: In that case it might be possible that you connect the Radarcape to the Router, and then access it via WLAN and via Router, but it might fail)
On those Radarcape based on Debian, the static IP address can be configured in the Configuration - Network Settings menu.
Accessing the Service Interface
The Radarcape has 2 USB connectors:
- A standard USB type A on the front panel, e.g. for memory sticks or other extensions
- A micro USB connector on the back side, next to the antenna connectors. This allows you to connect to the service interface or linux console. Lets use the word console from now on.
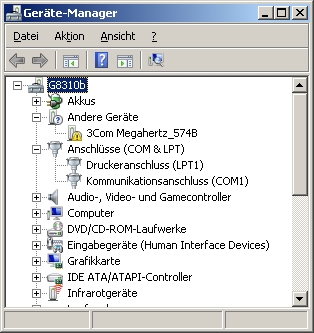
Take a standard USB cable and connect the back side USB. Check in the device manager (german: Geräte-Manager) that a COM port becomes created.
 |
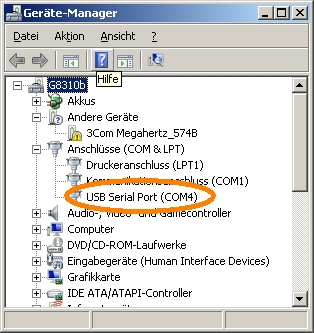 |
- If it does, skip the FTDI driver installation. Parameters of this COM port are 115200Bit/sec 8N1.
- If not, perform the FTDI driver installation and check if the COM port appears.
Install FTDI drivers
From the link FTDI driver web page, download the driver that fits to your system and install it. You should then see the COM port that becomes created from the Radarcape.
Note: On the rigtht side in the table of FTDIs page, the 'Comments' column, there is a downloadable install package, which might be easier to use.
Download and execute Putty terminal
We recommend Putty as console terminal, because it also supports SSH network connectivity.
Download Putty from here. There is no need to install, it is directly executable.
Start Putty and enter the above detected COM port, 115200 and serial into the startup menu:
Once Putty is up, press Enter and you shall see something like below. Enter 'root' into the username prompt and simply press enter when beeing asked for your password (or mind your previously set password)
Display your Current Network Connection
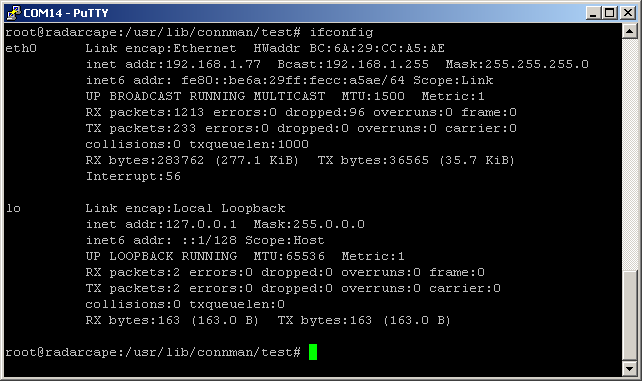
Once you have established the console connection, you can see your assigned IP address with the command 'ifconfig'.
Modify Configuration for Static IP
To be continued....
How to is described here: http://www.gigamegablog.com/2012/02/06/beaglebone-linux-101-assigning-a-static-ip-address-with-connman/
IMPORTANT NOTE: These commands must be issued through a serial console connection through the back side USB port, not via an SSH login. When the IP address is changed, it terminates the network connection, and with that it also terminates the setting process.

