Radarcape:Recovery: Difference between revisions
No edit summary |
|||
| (27 intermediate revisions by 2 users not shown) | |||
| Line 23: | Line 23: | ||
* [[Radarcape:Recovery#Radarcape_1st_generation|'''Radarcape 1st generation''' (based on Beaglebone White)]] | * [[Radarcape:Recovery#Radarcape_1st_generation|'''Radarcape 1st generation''' (based on Beaglebone White)]] | ||
* [[Radarcape:Recovery#Radarcape_2nd_generation|'''Radarcape 2nd generation''' (based on Beaglebone Black)]] | * [[Radarcape:Recovery#Radarcape_2nd_generation|'''Radarcape 2nd generation including Radarcape EVO''' (based on Beaglebone Black)]] | ||
* [[Radarcape:Recovery# | * [[Radarcape:Recovery#Airsquitter|'''Airsquitter''']] | ||
If you are unsure of which Radarcape version you own, you can peek into the small hole in the back and check if the board on the bottom is white or black. | If you are unsure of which Radarcape version you own, you can peek into the small hole in the back and check if the board on the bottom is white or black. | ||
==Devices== | ==Devices== | ||
===Radarcape 1st generation=== | ===Radarcape 1st generation - Beaglebone White=== | ||
The Radarcape internally contains a microSD card of at least 2GB. | The Radarcape internally contains a microSD card of at least 2GB. | ||
| Line 35: | Line 35: | ||
For this operation you need to open the front panel of the Radarcape using a Torx TX-10 screwdriver and you need a microSD card reader, or eventually a adapter to full SD card size available in most readers. | For this operation you need to open the front panel of the Radarcape using a Torx TX-10 screwdriver and you need a microSD card reader, or eventually a adapter to full SD card size available in most readers. | ||
Download the recovery image [ | Download the recovery image '''[http://jetvision.de/resources/images/sd_radarcape_white.htm from here]'''. | ||
Flashing procedure: | Flashing procedure: | ||
| Line 47: | Line 47: | ||
The device takes about 5 minutes to complete the restore and will reboot during this process. | The device takes about 5 minutes to complete the restore and will reboot during this process. | ||
===Radarcape 2nd generation=== | ===Radarcape 2nd generation - Beaglebone Black=== | ||
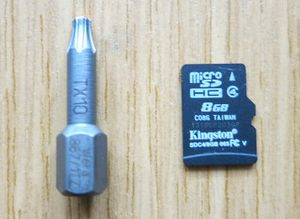
For this operation you need to open the front panel of the Radarcape using a Torx TX-10 screwdriver, and you also need a SDSC or SDHC microSD card of any size between 256MB and 32GB. | For this operation you need to open the front panel of the Radarcape using a Torx TX-10 screwdriver, and you also need a SDSC or SDHC microSD card of any size between 256MB and 32GB. | ||
| Line 53: | Line 53: | ||
[[File:Sdcard_and_torxbit.jpg|300px]] | [[File:Sdcard_and_torxbit.jpg|300px]] | ||
There are two different recovery images: | |||
The legacy Radarcape, serial number starting with 1304-, | |||
Radarcape recovery image '''[http://jetvision.de/resources/images/sd_radarcape_black.htm from here]'''<br> | |||
and the later generation Radarcape EVO, showing EVO on the front panel and the label, and a serial number starting with 1307- | |||
Radarcape EVO recovery image '''[http://jetvision.de/resources/images/sd_radarcape_evo.htm from here]''' | |||
Download the recovery image, flash it to a SD card, and then transfer it to the local eMMC storage of your Radarcape [[Radarcape:Recovery#Radarcape_recovery_flashing_procedure|as it is described here]]. | |||
====Radarcape recovery flashing procedure==== | |||
* Open the front panel | * Open the front panel | ||
Using the Torx TX-10 screwdriver open the two front panel screws. Due to machine tightening, it may be hard at the starting point. Don't use a power tool and don't use a | Using the Torx TX-10 screwdriver open the two front panel screws. Due to machine tightening, it may be hard at the starting point. Don't use a power tool and don't use a screwdriver with wear. Also, don't use drill bits or Philips screwdrivers. | ||
[[File:Remove_screws.jpg|none|thumb|300px]] | [[File:Remove_screws.jpg|none|thumb|300px]] | ||
| Line 96: | Line 103: | ||
[[File:Switch_to_eMMC_boot.jpg|none|thumb|300px]] | [[File:Switch_to_eMMC_boot.jpg|none|thumb|300px]] | ||
=== | ===Airsquitter=== | ||
The Airsquitter internally contains a microSD card of at least 8GB. It is '''not''' required to open the case for a full recovery. | |||
Download the recovery image '''[http://jetvision.de/resources/images/sd_air-squitter.htm from here]'''. | |||
There are two options: | |||
1) Open the case, remove the SD card and directly flash the image to the SD card using, for example, Balena Etcher (experts, nerds and specialists may also use dd) | |||
Flashing procedure: | 2) Flashing procedure (without opening the case): | ||
* Disconnect all cables from the device | * Disconnect all cables from the device | ||
* Connect a cable between your PC and the microUSB port in the back of the device. | * Connect a cable between your PC and the microUSB port in the back of the device. | ||
| Line 110: | Line 120: | ||
The display will show the several steps of the internal recovery which can take about 5 minutes. | The display will show the several steps of the internal recovery which can take about 5 minutes. | ||
==Flash the image into a card== | ==Flash the image into a card== | ||
Latest revision as of 12:20, 28 November 2025

|
Required computer skills to execute this task: Intermediate |
Scope
This procedure can be used for a complete restore of the device as it is delivered from factory.
The currently supported recovery image is based on Debian 10 and Linux 5.4.
All our device variants are fully supported for the latest software. To recover your device download the recovery image below and continue to the flash instructions.
- Radarcape 1st generation (based on Beaglebone White)
- Radarcape 2nd generation including Radarcape EVO (based on Beaglebone Black)
- Airsquitter
If you are unsure of which Radarcape version you own, you can peek into the small hole in the back and check if the board on the bottom is white or black.
Devices
Radarcape 1st generation - Beaglebone White
The Radarcape internally contains a microSD card of at least 2GB.
For this operation you need to open the front panel of the Radarcape using a Torx TX-10 screwdriver and you need a microSD card reader, or eventually a adapter to full SD card size available in most readers.
Download the recovery image from here.
Flashing procedure:
- Disconnect all cables from the device.
- Open the front panel using the Torx TX-10 screwdriver.
- Remove the microSD card.
- Flash the recovery image using a PC.
- Install the microSD card back into the device.
- Power the device.
The device takes about 5 minutes to complete the restore and will reboot during this process.
Radarcape 2nd generation - Beaglebone Black
For this operation you need to open the front panel of the Radarcape using a Torx TX-10 screwdriver, and you also need a SDSC or SDHC microSD card of any size between 256MB and 32GB.
There are two different recovery images:
The legacy Radarcape, serial number starting with 1304-,
Radarcape recovery image from here
and the later generation Radarcape EVO, showing EVO on the front panel and the label, and a serial number starting with 1307-
Radarcape EVO recovery image from here
Download the recovery image, flash it to a SD card, and then transfer it to the local eMMC storage of your Radarcape as it is described here.
Radarcape recovery flashing procedure
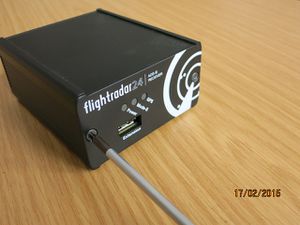
- Open the front panel
Using the Torx TX-10 screwdriver open the two front panel screws. Due to machine tightening, it may be hard at the starting point. Don't use a power tool and don't use a screwdriver with wear. Also, don't use drill bits or Philips screwdrivers.
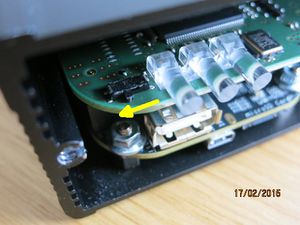
- Set Boot Switch to SD Card Boot
There is a little slide switch on the top board. Shift this to the left hand position.
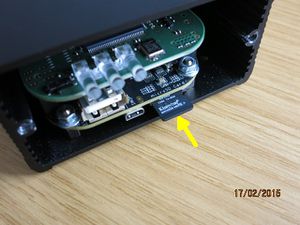
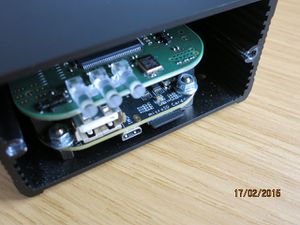
- Insert the microSD card
Insert the SD card. The label and text towards the upper side. Push in as far as it locks in the slot.
- Apply power to the unit
It is strongly recommended to have a network connection with a DHCP service connected to the LAN port while performing this procedure.
You shall connect the network before applying power.
Replug the power supply. You then should see the blue LEDs in the back flashing.
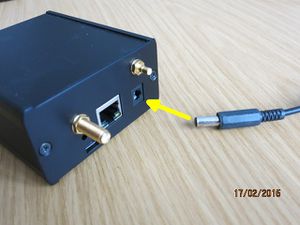
The recovery process takes about 1min for the Flightradar24 box and little longer for the Radarcape. If successful, the Radarcape/Flightradar24 receiver automatically powers off. All LEDs will be off then.
If it has not powered off automatically, something is wrong with your update process.
Eventually you forgot to connect a network cable providing DHCP?
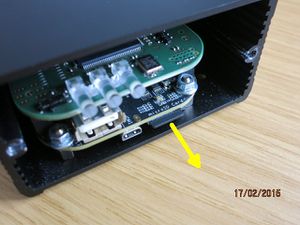
- Remove SD Card
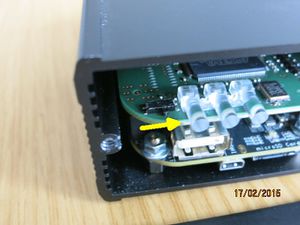
- Reset Boot Switch to eMMC Boot
Reset the boot switch to eMMC boot and unplug the power.
Airsquitter
The Airsquitter internally contains a microSD card of at least 8GB. It is not required to open the case for a full recovery.
Download the recovery image from here. There are two options:
1) Open the case, remove the SD card and directly flash the image to the SD card using, for example, Balena Etcher (experts, nerds and specialists may also use dd)
2) Flashing procedure (without opening the case):
- Disconnect all cables from the device
- Connect a cable between your PC and the microUSB port in the back of the device.
- Press and keep pressed the front button while you connect the Power DC jack. The device will show on the display "RECOVERY".
- The internal microSD card will be mounted on your PC as if it was plugged directly. You can now flash the image you downloaded.
- After flashing is complete (typically takes about 3 minutes), eject the device from your PC if possible. If not, disconnect all cables and reconnect the Power DC jack.
The display will show the several steps of the internal recovery which can take about 5 minutes.
Flash the image into a card
Some PC operating systems can flash the compressed images (.img.xz) by default.
If your operating system does not support it or you don't know how to do it, we recommend you install and use Etcher
