Radarcape:Installation Guide: Difference between revisions
imported>Beastadmin No edit summary |
imported>Beastadmin No edit summary |
||
| Line 6: | Line 6: | ||
__TOC__ | __TOC__ | ||
= | =Radarcape Hardware Installation= | ||
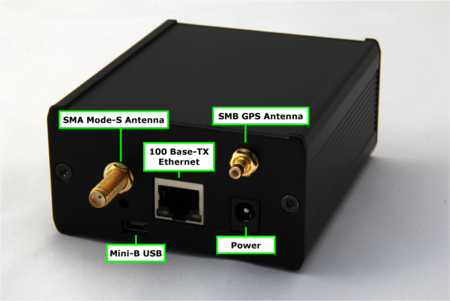
[[File:Radarcape-back.png|450px|Radarcape backside explained]] | [[File:Radarcape-back.png|450px|Radarcape backside explained]] | ||
Plug the following connectors into the Radarcape | Plug the following connectors into the Radarcape: | ||
* Mode-S antenna | |||
* GPS antenna | |||
* Ethernet/LAN cable | |||
* Power cable | |||
Connect the power supply with the electrical outlet. | Connect the power supply with the electrical outlet. | ||
=Mode-S-Antenna Placement= | |||
The Mode-S antenna should be placed as free and as high as possible. | The Mode-S antenna should be placed as free and as high as possible. | ||
Make sure the Mode-S antenna has a conductive connection with protective ground. Otherwise, static electricity may cause damage to your Radarcape. | |||
==GPS Antenna Placement== | |||
Some users reported running the GPS antenna indoors. This is not guaranteed to work. | The GPS antenna should be placed to a point with at least half of the sky in free sight, for example a window sill. Some users reported running the GPS antenna indoors. This is not guaranteed to work. | ||
= | =Hostname and Network Address= | ||
Network devices can be accessed in two ways: | Network devices can be accessed in two ways: | ||
* via | * via IP address (e.g., ''192.168.1.157'') | ||
* via '''hostname''' ( | * via hostname (e.g., ''radarcape'') | ||
The '''IP address''' is provided to your Radarcape during startup via the http://en.wikipedia.org Dynamic Host Configuration Protocol] (DHCP) service. Usually, your Internet router provides the DHCP service in your network and | |||
assigns an IP address to your device. A fixed address can be configured via the Linux command line. | |||
{| class="wikitable" | |||
|[[File:dhcp_ddwrt.jpg|500px|thumb|DHCP listing of a DD-WRT router showing hostnames RC70 and RC71 as 192.168.1.180 and 192.168.1.133]] | |||
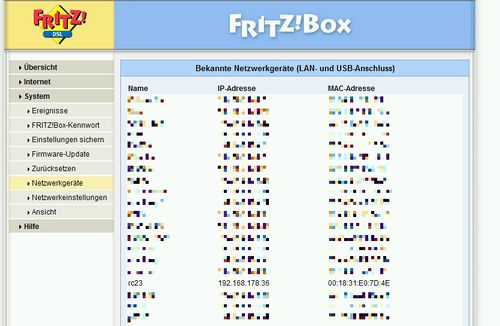
|[[File:dhcp_fritzbox.jpg|500px|thumb|DHCP listing of a Fritzbox showing hostname RC23 as 192.168.178.36]] | |||
|} | |||
Fixed addresses can be assigned configured via the Linux command line. For the configuration of a fixed IP address, please refer to one of the Linux manuals you can find in the Internet. | |||
The hostname is a given name that is stored internally in your device (see /etc/hostname). If there is no | |||
label on the back side of your Radarcape, the hostname is '''radarcape'''. | |||
''Note:'' Some router models require appending the '''.local''' to the hostname. In this case '''radarcape.local''' must be used instead of simply '''radarcape'''. | |||
=Linux Command Line Interfaces= | |||
For some special cases it is necessary to access the linux system console. | |||
There are two ways how to connect to the Linux system: | |||
* SSH through the network (recommended) | |||
* Back side Mini USB connector (only hardware versions with SN 1302-XXXX) | |||
==SH Access to the Radarcape Using Putty== | |||
We recommend Putty as SSH client on Windows. | |||
Download the Putty executable from [http://www.putty.org http://www.putty.org]. | |||
Start Putty, set the Connection Type to '''SSH''', and the Host Name to '''radarcape'''. | |||
TODO IMAGE | |||
Click on the Open button and the login screen appears. Enter the username '''root''' and press enter | |||
when being asked for your password (or the password if you have set one). | |||
TODO IMAGE | |||
==Accessing the Linux Console via USB== | |||
This | The Radarcape has 2 USB connectors: | ||
* A standard USB type A on the front panel, e.g., for memory sticks, DVB-T sticks or other extensions | |||
* A micro USB connector on the back side. This allows you to connect to the Linux console via a virtual serial device | |||
''Note:'' The Linux console via the micro USB interface is only available on hardware versions with serial number SN 1302-XXXX | |||
Take a USB cable and connect the back side USB. Check in the device manager that a COM port becomes created. | |||
TODO TWO IMAGES | |||
* If it does, skip the FTDI driver installation. | |||
* If not, perform the FTDI driver installation and check if the COM port appears. | |||
Parameters of this COM port are 115200 Bit/sec 8N1. | |||
==Install FTDI Drivers== | |||
Download the driver from the FTDI driver Web page ([http://www.ftdichip.com/FTDrivers.htm http://www.ftdichip.com/FTDrivers.htm]) that fits to your system and install it. The COM port should appear when the driver has successfully been installed. | |||
==Using Putty as Client for the Serial Console== | |||
The software Putty can also be used to access the Radarcape via the virtual serial device. | |||
Download the Putty executable from [http://www.putty.org http://www.putty.org]. | |||
Start Putty and enter the above detected COM port, 115200 and serial into the startup menu: | |||
TODO IMAGE | |||
Click on the Open button and the login screen appears. Enter the username 'root' and press enter when being asked for your password (or the password if you have set one). | |||
TODO IMAGE | |||
= | =Installation of Basestation and Flightroute Databases= | ||
The Radarcape can use external databases for displaying additional information to the 2D map and the aircraft list. | The Radarcape can use external databases for displaying additional information to the 2D map and the aircraft list. | ||
* | * ''basestation.sqb'': aircraft type and '''registration'''. | ||
* | * ''flightroutes.sqb'': flight plan information ('''origin''' and '''destination''') | ||
These databases are not installed when we ship the Radarcape. Users can download and install them from third-party sources. This can be done via the ''Software Maintenance'' menu. | These databases are not installed when we ship the Radarcape. Users can download and install them | ||
from third-party sources. This can be done via the '''Software Maintenance''' menu. | |||
[[File:Radarcape Software Maintenance.png|550px|none|thumb|Radarcape Software Maintenance]] | [[File:Radarcape Software Maintenance.png|550px|none|thumb|Radarcape Software Maintenance]] | ||
The databases can be obtained from these sources: | The databases can be obtained from these sources: | ||
* Plane Base NG (basestation.sqb, [http://planebase.biz http://planebase.biz]) | |||
* PP Routes Yahoo Group (flightroutes.sqb, [http://groups.yahoo.com/neo/groups/PP-logs-and-routes/files http://groups.yahoo.com/neo/groups/PP-logs-and-routes/files], registration required) | |||
As both databases contain information that is subject to change, we recommend you to update these | |||
databases in regular intervals. | |||
=== | ===Radarcape Configuration=== | ||
All changes of the Radarcape configuration can be done via the Web interface. | |||
[[File:Radarcape-webconfig.jpg|550px|none|thumb|Radarcape Settings Web Page]] | [[File:Radarcape-webconfig.jpg|550px|none|thumb|Radarcape Settings Web Page]] | ||
If all settings have been made, scroll to the bottom of the page, enter the password, and press “Save Changes” to store the configuration. The default password for changing the configuration is '''radarcape'''. | |||
''Note:'' Due to feature enhancements and changes, this page is often subject to change. | |||
===Advanced Configuration Interfaces / Commandline Access=== | ===Advanced Configuration Interfaces / Commandline Access=== | ||
| Line 100: | Line 146: | ||
* Back side Mini USB connector | * Back side Mini USB connector | ||
==Set Root Password== | |||
==Set/Change Root Password== | |||
In the default configuration, no password is set for the root user (administrator) on the Radarcape. We strongly advise you to set a password for security reasons. | In the default configuration, no password is set for the root user (administrator) on the Radarcape. We strongly advise you to set a password for security reasons. | ||
Revision as of 16:44, 19 April 2015

|
Required computer skills to execute these tasks: Beginner |
Radarcape Hardware Installation
Plug the following connectors into the Radarcape:
- Mode-S antenna
- GPS antenna
- Ethernet/LAN cable
- Power cable
Connect the power supply with the electrical outlet.
Mode-S-Antenna Placement
The Mode-S antenna should be placed as free and as high as possible.
Make sure the Mode-S antenna has a conductive connection with protective ground. Otherwise, static electricity may cause damage to your Radarcape.
GPS Antenna Placement
The GPS antenna should be placed to a point with at least half of the sky in free sight, for example a window sill. Some users reported running the GPS antenna indoors. This is not guaranteed to work.
Hostname and Network Address
Network devices can be accessed in two ways:
- via IP address (e.g., 192.168.1.157)
- via hostname (e.g., radarcape)
The IP address is provided to your Radarcape during startup via the http://en.wikipedia.org Dynamic Host Configuration Protocol] (DHCP) service. Usually, your Internet router provides the DHCP service in your network and assigns an IP address to your device. A fixed address can be configured via the Linux command line.
 |
 |
Fixed addresses can be assigned configured via the Linux command line. For the configuration of a fixed IP address, please refer to one of the Linux manuals you can find in the Internet.
The hostname is a given name that is stored internally in your device (see /etc/hostname). If there is no label on the back side of your Radarcape, the hostname is radarcape.
Note: Some router models require appending the .local to the hostname. In this case radarcape.local must be used instead of simply radarcape.
Linux Command Line Interfaces
For some special cases it is necessary to access the linux system console. There are two ways how to connect to the Linux system:
- SSH through the network (recommended)
- Back side Mini USB connector (only hardware versions with SN 1302-XXXX)
SH Access to the Radarcape Using Putty
We recommend Putty as SSH client on Windows. Download the Putty executable from http://www.putty.org. Start Putty, set the Connection Type to SSH, and the Host Name to radarcape.
TODO IMAGE
Click on the Open button and the login screen appears. Enter the username root and press enter when being asked for your password (or the password if you have set one).
TODO IMAGE
Accessing the Linux Console via USB
The Radarcape has 2 USB connectors:
- A standard USB type A on the front panel, e.g., for memory sticks, DVB-T sticks or other extensions
- A micro USB connector on the back side. This allows you to connect to the Linux console via a virtual serial device
Note: The Linux console via the micro USB interface is only available on hardware versions with serial number SN 1302-XXXX
Take a USB cable and connect the back side USB. Check in the device manager that a COM port becomes created.
TODO TWO IMAGES
- If it does, skip the FTDI driver installation.
- If not, perform the FTDI driver installation and check if the COM port appears.
Parameters of this COM port are 115200 Bit/sec 8N1.
Install FTDI Drivers
Download the driver from the FTDI driver Web page (http://www.ftdichip.com/FTDrivers.htm) that fits to your system and install it. The COM port should appear when the driver has successfully been installed.
Using Putty as Client for the Serial Console
The software Putty can also be used to access the Radarcape via the virtual serial device.
Download the Putty executable from http://www.putty.org.
Start Putty and enter the above detected COM port, 115200 and serial into the startup menu:
TODO IMAGE
Click on the Open button and the login screen appears. Enter the username 'root' and press enter when being asked for your password (or the password if you have set one).
TODO IMAGE
Installation of Basestation and Flightroute Databases
The Radarcape can use external databases for displaying additional information to the 2D map and the aircraft list.
- basestation.sqb: aircraft type and registration.
- flightroutes.sqb: flight plan information (origin and destination)
These databases are not installed when we ship the Radarcape. Users can download and install them from third-party sources. This can be done via the Software Maintenance menu.
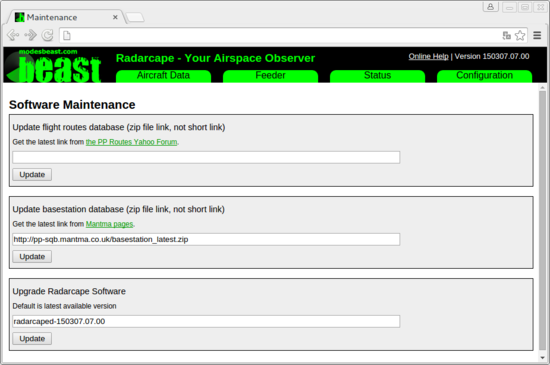
The databases can be obtained from these sources:
- Plane Base NG (basestation.sqb, http://planebase.biz)
- PP Routes Yahoo Group (flightroutes.sqb, http://groups.yahoo.com/neo/groups/PP-logs-and-routes/files, registration required)
As both databases contain information that is subject to change, we recommend you to update these databases in regular intervals.
Radarcape Configuration
All changes of the Radarcape configuration can be done via the Web interface.
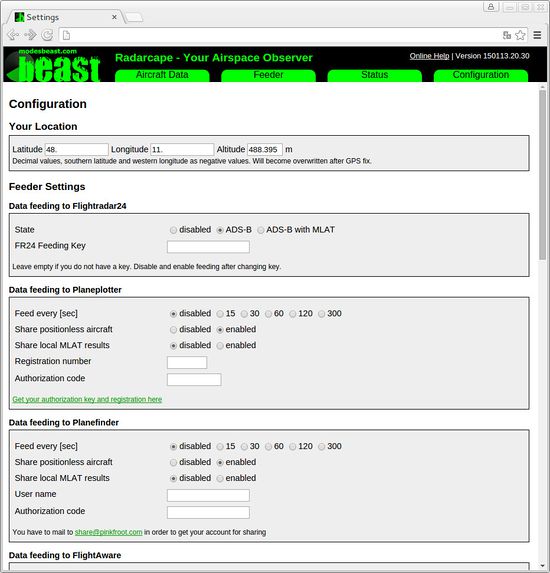
If all settings have been made, scroll to the bottom of the page, enter the password, and press “Save Changes” to store the configuration. The default password for changing the configuration is radarcape.
Note: Due to feature enhancements and changes, this page is often subject to change.
Advanced Configuration Interfaces / Commandline Access
There are two ways how to connect to the Linux system:
- SSH through the network
- Back side Mini USB connector
Set/Change Root Password
In the default configuration, no password is set for the root user (administrator) on the Radarcape. We strongly advise you to set a password for security reasons.
Please remember your password as there is currently no other password recovery method than creating a new SD card image for your Radarcape.
First you must login to your Radarcape via SSH.
- Windows users can use the free SSH client Putty.
- Linux/Unix users may use SSH from the command line.
ssh root@radarcape
An initial root password has not been set. Therefore, you can login with user root and no password.
After you have logged in on your Radarcape, you can set a new root password with the following command:
passwd
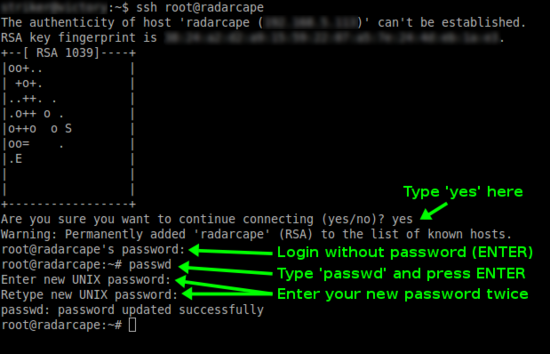
The message passwd: password updated successfully will indicate that the new password has been set.
