Air!Scout:Flarm Local Receiver: Difference between revisions
No edit summary |
|||
| Line 6: | Line 6: | ||
* Check that GPS is stable (Status -> GPS) | * Check that GPS is stable (Status -> GPS) | ||
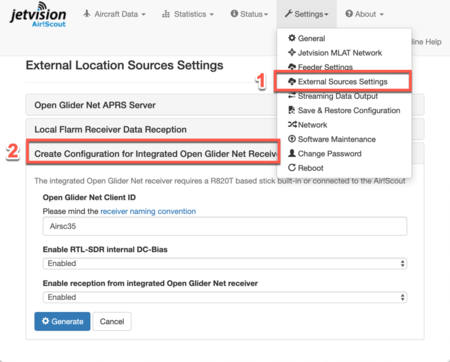
* Create the configuration file for OGN receiver (Settings -> External Sources Settings -> | * Create the configuration file for OGN receiver (Settings -> External Sources Settings -> Create Configuration for Integrated Open Glider Net Receiver) | ||
** Select a location name according to the naming rules | ** Select a location name according to the naming rules | ||
** Enable bias current if you are using Jetvision's Active Diapason Antenna | ** Enable bias current if you are using Jetvision's Active Diapason Antenna | ||
Revision as of 18:12, 12 May 2019
Local Flarm Receiver (Optional)
Bild: AirScout Rückseite mit Flarm-Buchse und Kabel zur Active Diapason 868MHz, ähnlich <https://www.qsl.net/dl4mea/fpgaadsb/modesbeast-2ch-omni-yagi.gif>
Air!Scout can optionally be equipped with a RTL-SDR stick, and by that serve some SDR applications. It comes with preinstalled software from the Open Glider Network (see http://wiki.glidernet.org/start). Air!Scout is able to include the results of this receiver into its own database and show Flarm aircraft together with ADS-B and MLAT data in a common map. However, in order to work correctly, some steps have to be done after installation of the hardware:
- Check that GPS is stable (Status -> GPS)
- Create the configuration file for OGN receiver (Settings -> External Sources Settings -> Create Configuration for Integrated Open Glider Net Receiver)
- Select a location name according to the naming rules
- Enable bias current if you are using Jetvision's Active Diapason Antenna
- Enable reception of local results
- Watch the incoming messages from OGN receiver (Status -> Local Flarm Receiver Connection)
Bild: Incoming Flarm results
In case of troubles, disable and re-enable the OGN receiver part within Settings -> External Sources Settings -> Local Flarm Receiver Data Reception -> Save
